| Function: | Lamp Cap And Holders Twist Testing | Range: | 0~10Nm |
|---|---|---|---|
| Over Loading: | 120% FS | Accuracy: | ≤1% |
| Repeatability: | ≤0.5% FS | Linearity: | ≤0.5% FS |
| Lag: | ≤0.5% FS | Customize: | OEM, ODM |
| High Light: | 10Nm Light Testing Equipment , SGS Light Testing Equipment , 15V LED Testing Equipment |
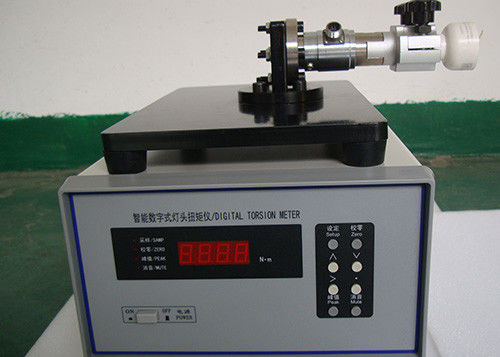
Lamp Cap And Holders Test Meter Lamp Foot Twist Testing Apparatus
Technical parameters:
This tester is mainly used to measure the torque of the lamp holder of all kinds of lighting source, its main performance and technical parameters as below:
| Range | 0~10Nm |
| Accuracy | ≤1% |
| Repeatability | ≤0.5% FS |
| Linearity | ≤0.5% FS |
| Lag | ≤0.5% FS |
| Over loading | 120% FS |
| Temperature compensate range | -10℃~60℃ |
| Requirements for environment: Working temperature | 25±5°C Relative humidity: ≤65%R.H Power: AC 230V±10V, 50Hz±1Hz |
| Permissions for environment | Working temperature: 0-40°C Relative humidity: ≤75%R.H Power: AC 230V±10%, 50Hz |
| Store condition | Temperature -20~50°C |
| Humidity | <75%R.H |
| Dimension | 330mm×110mm×335mm |
| Weight | 6kg |
| Power | 15VA |

Description:
Lamp cap Torsion Meter is a newly developed intelligent product with microprocessor built-in.The digital torsion meter is a mechanical strength safety requirement of the lamp cap which has been taken into account by most lighting manufactures and is also compulsively required by all the nations. Thus we developed the digital torsion meter with the reference of the IEC. It meets the requirement for the measurement of lamp cap torque force test of the quality inspect de-partment and manufactures.
Characteristics:
1) It can measure the clockwise and anti-clockwise torque of lamp cap. And it can preset upper limit alarm. Auto save data after system shutting down.
2) Instrument has the function of zero point calibration. The zero point is very steady. Instrument uses 4 digits of number to display. So it is of high accuracy and high stability.
3) Double watchdogs designed inside to ensure the instrument high reliability and will not shut down under complicated environment.
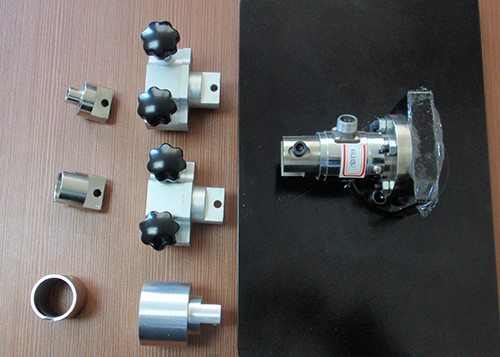
4) Instrument is convenient to be used because of several clamps of lamp caps such as E27/E26, B22d, E14/E12, G13/G5 and so on.
5)Fixing with clamp. Rotating the lamp, the positive and negative torque rate will be recorded.
6)Torque range: 0-10N*m (special range is customer-tailored).
7)High performance in reliability, precision and longevity by adopt strain gauge torque sensor
8)Peak torque holding function, upper limit can be set for alarm.
9) Conform to Chinese and international standard.
Basic Principle
The equipment is consisted by torsion device and secondary meter. The key for accuracy is the
torque sensor. The equipment adopt strain type torque sensor with the features of high reliable,
cost-effective, high accuracy and long life.
In sensor on the elastomer labeled resistance strain gage and composition Wheatstone bridge. Power
the bridge with driving voltage, under the action of the torque, the elastomer will deform and the
strain gage will change, so that the bridge will imbalance and there is a linear voltage signal
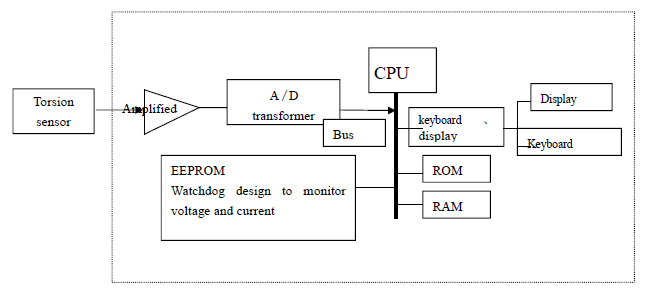
between bridge output and torsion. The secondary meter will be amplified the voltage signal, and transform the signal by A/D transformer, and then send to the microprocessor for data analysis and
display. Functional block diagram as following:

Fig.1 Functional block diagram
KP338 digital torsion meter is applied to measure torsion of all kinds of lamp holder.
Operation Instruction
5.1 Front panel and function
Specification:
1. Window: 5-digit displays the measurement and prompt message.
2. Indicator
SAMP:The equipment is on the sampling mode when it flashes. Refresh frequency: 2times/s.
3. ZERO:The equipment is on the zeroing mode when it flashes. .
4. PEAK:The equipment is on the peak holding mode when it flashes.
5. BELL:Indicate to showdown the buzzer.
Keyboard
ZERO:On the test condition, press this key to enter into zeroing mode, after finish the zeroing, the
equipment will save the data and re-back to test mode automatically. On the peak condition, press
the key to clean the value.
SET:On the normal test condition, press this key to set the upper limit alarm.
PEAK:On the normal test condition, press this key to hold the peak value; press again this key to
re-back to normal test mode.
∧ :On the set and calibration mode, press this key, the cursor will tally up.
∨ :On the set and calibration mode, press this key, the cursor will tally down.
> :On the set and calibration mode, press this key, the cursor will right shift.
• :On the set and calibration mode, press this key, decimal point insert.
5.2 Real panel and function
1. Signal input and output port: for signal transmission.
2. Protective tube: 0.5A fuse to protect the equipment power.
3. Power plug: Inclusion filter to stop the disturbance.
5.3. Lamp holder torsion test
Firstly, confirm the holder model; then install the corresponding fixture, and mounted the lamp
holder on the clamp.
Connect the torsion device with equipment by signal input port. Turn on the secondary meter to
preheat for 5min. If the window is not equal to 0.000, then equipment should be zeroed. User can
set an upper limit according to the Chinese or international standards. Clockwise rotation and contra
rotate the lamp holder. During the time, the window will show the current value; until the
equipment alarming, user can judge if the lamp holder is still in the good condition.
5.4. Zeroing
After long time using, the equipment may be zero drift, and affect the accuracy. At that time, the equipment must be zeroed. But please notice, the torsion sensor cannot be worked. Press “zero” key,the window will display “ZERO”, and then “ZERO” indictor will flash; If the user do not want to
continue, just press “peak” key to exit. When the “ZERO” indicator turns off, that means the equipment finish the zeroing and re-back to normal.
5.5. Upper limit
Press “SET” key, the window will show “SET”; If the user do not want to continue reset, press“PEAK” key to exit. With the help of “>”,“∧”,“∨”,“·” keys to set the upper limit, press again“set” key to save and exit. If user do not want to save the value, just press “PEAK” key to exit set mode.
5.6. Calibration
The equipment has been calibrated before on sale. Users do not need to re-calibrate it. But there is deviation after long time no use, which will affect the accuracy. At that time, the equipment needs some special device to re-calibration.
Apply a certain torque to the torque sensor (forward direction or reverse direction), in the normal test mode, 5 times press “.” key, and then press “SET” key, the window will display“CAL.R”when user apply a forward torsion to the torque sensor; At that time, if user does not want to do recalibration, just press “PEAK” key to exit. If user wants to do calibration, just press “set” key, the equipment will in the forward calibration mode, and at that time, the window is showing the calibration value of last time. If the value is difference, just reset the standard value with the help of
“ > ” ,“∧” ,“∨” ,“·” keys. Press again “CAL” key, the equipment will display calibration coefficient, then you can reset the calibration coefficient with the help of “>”,“∧”,“∨”,“·” keys.Or just press “CAL” key, and then input the standard value and standard coefficient. If user does not want to save the data, just press “peak” key to exit. The reverse calibration is as same as forward calibration.
If the coefficient is lost, just input the below calibration coefficient to the equipment.
Notice
1. Forbidden overload use, otherwise will reduce the property.
2. Forbidden beat and crash while install the load and clamp.
3. Forbidden oil stain, water and other chemicals.
4. Preheat for 5 min before test.

