Detailed Product Description
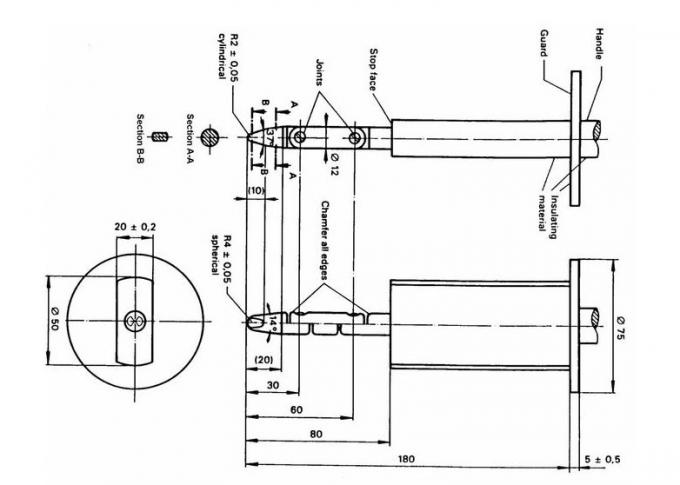
| Standards: | IEC 61032 Figure 2 | Type: | IEC Test Finger Probe |
|---|---|---|---|
| Material: | Stainless Steel And Nylon | Finger Length: | 80±0.2mm |
| Knurled Finger Diameter: | 12mm | Baffle Plate Diameter: | 50mm |
| Baffle Plate Length: | 100mm | Baffle Thickness: | 20mm |
| High Light: | probe b of iec 61032 30N , 30N probe b of iec 61032 , 10N standard test finger |
IEC61032 Figure 2 Test Probe B standard test finger Shell anti electric shock with thrust 10N 20n 30n
Specification and technical parameters:
| Parameters /Model | SC-F2B | SC-F2B -A | SC-F2B -B | SC-F2B-F |
| Name | Standard test finger | Circular baffle test finger | Large baffle test finger | Standard test finger with force |
| 1 | 30±0.2 | 30±0.2 | 30±0.2 | 30±0.2 |
| 2 | 60±0.2 | 60±0.2 | 60±0.2 | 60±0.2 |
| 3 | 80±0.2 | 80±0.2 | 100±0.2 | 80±0.2 |
| 4 | 180±0.2 | 180±0.2 | —- | 180±0.2 |
| 5 | R2±0.05 | R2±0.05 | R2±0.05 | R2±0.05 |
| 6 | S4±0.05 | S4±0.05 | S4±0.05 | S4±0.05 |
| 7 | 37o 0 -10’ | 37o 0 -10’ | 37o 0 -10’ | 37o 0 -10’ |
| 8 | 14o 0 -10’ | 14o 0 -10’ | 14o 0 -10’ | 14o 0 -10’ |
| 9 | Ф12 0 -0.05 | Ф12 0 -0.05 | Ф12 0 -0.05 | Ф12 0 -0.05 |
| 10 | Ф50 | Ф50 | —- | Ф50 |
| 11 | 20±0.2 | —- | —- | 20±0.2 |
| 12 | Ф75±0.2 | Ф75±0.2 | Ф125±0.2 | Ф75±0.2 |
| 13 | 5±0.5 | 5±0.5 | —- | 5±0.5 |
| 14 | —- | —- | —- | 10-50N force |
| 15 | IEC61032.1 | IEC60335-1 | IEC60335-2-14 | IEC60529 |
Product information:
This is a precision test finger made in accordance with many standards like
IEC 61032 figure 2,
IEC60950 figure 2A,
IEC60884,
IEC60335,
UL507,
and UL1278 figure 8.4.
This probe is intended to verify the basic protection against access to hazardous parts. It is also used to verify the protection against access with a finger. This test finger probe consists of ditto, finger, base and insulated handle which simulates the characteristics of the human hand. It has two movable joints, which can be curved at 90°.
Application:
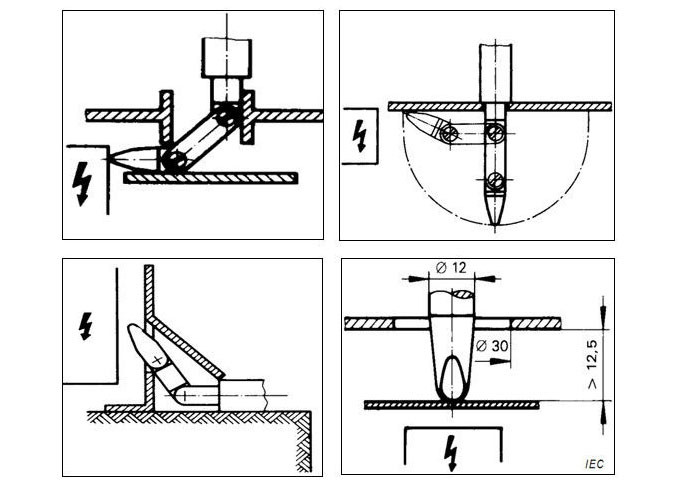
1.The joint parts of the test finger cannot touch the live parts or hazardous parts, and the 50mm-20mm Baffle Plate cannot enter.
2.In the test requirements of preventing from approaching to the hazardous parts, the probe B test probe needs to with a 10±3N thrust. The product without force should be used with push-pull dynamometers.
3.In the test of against electric shock, wiring ,configuration and power and indicating device are needed. Turn on the power of the tested sample, and exert the corresponding force to determine whether the grounding line are connected (3 inserts).
4.Both joints shall permit movement in the same plane and the same direction through an angle of 90° with a 0° to +10° tolerance
This probe is intended to verify the basic protection against access to hazardous parts.
It is also used to verify the protection against access with a finger.
Tolerance on dimensions when no specific tolerance is given:
– on angles: 0
−10°
– on linear dimensions: up to 25 mm: 0
− 0,05 mm; over 25 mm: ± 0,2 mm.
Customizable: it can be used for anti-electric shock test when equipped with pluggable banana plugs and amphenol connector at the end of the handle , or used for enclosure protection test when open threaded hole of M6 at the end of the handle (connected with pull and push dynamometer).

Usage
1. The standard test finger joint part cannot be touched with the live parts, or cannot be close to the dangerous parts, and the 50mm-20mm baffle cannot enter.
2. The test of preventing from dangerous parts requires the test probe B with 10N±3N thrust. Generally it needs to work with a force gauge.
3. The anti-electric shock requires working with anti-shock probe experiment device: connected to the anti-shock probe experiment device (40V-50V), processing the test according to the relative standard, the buzzer ring is electric shock prompted. View the pictures below:
